Accessing the Motional nuPlan Data

Executive Summary
This article aims to help autonomous vehicle teams access the underlying data of the Motional nuPlan public dataset. It includes attached Python scripts your software teams can freely use to extract and view the deeper data immediately for whatever purposes they have. Contact us to discuss collaboration on autonomous vehicle safety projects related to this or other large-scale datasets. We want to help you improve, achieve, and demonstrate your AV safety.
Intro
At Retrospect we believe AV safety can only be achieved through open communication and sharing ideas, and data. Many major players in the AV industry have released large swaths of data for various uses and this is greatly appreciated. The data seems to be high quality and, to the benefit of anyone in the machine learning world, comes in huge quantities. However, in the spirit of safety, we wish the providers of these datasets would provide more direct access to the raw data, in addition to the large data structures provided as a sort of API to interface with the data.
I’ve spoken with colleagues in the industry who have lamented how it can take hours (or days) to get up and running with any of these datasets up. Big props to Motional, who was not in any way connected with this article, whose folks overseeing their git repository issues were extremely responsive with the few issues we brought up through the publicly-available channels. Typically, once users have the basics up and running, if their research is looking to use data in a way different than what the included API directly supports, it can be a job to dig your way to more extensive data access. It is here that I am trying to help with this article. That being said it’s ongoing work released where it’s at now to help others in the industry.
This blog post is written very informally and geared towards software folks.
The purpose of the nuplan dataset and this article’s intent
Let’s take a second to remember what this dataset is supposed to be about. Motional says in their nuPlan debut blog post that this is a (first-of-its-kind) “planning dataset.” The value being that while other datasets released by Waymo were intended for Preception System research and development, nuPlan is intended for Planning research and development. In full disclosure, I have not dived nearly as deep into those other datasets as I have with nuPlan so I can’t confirm Motional’s nuPlan is better for Planning research than others but it is the only one geared specifically towards Planning.
My recent work in AV safety has emphasized safety of Path Planning subsystems. So when I read about nuPlan, I was eager to give it a run. The general problem I’ve found in trying to use any of these public datasets is that it just takes time to confirm/deny what data is in the dataset and it takes time to figure out how to extract the data you need. This isn’t entirely the developers’ fault. First of all this is free data wrapped up in free software. Second of all, their intent is not to make the data conveniently accessible for general purposes but rather their intent is usually focused on some sort of public “Challenge” or “Competition” to see who can use the data and tools to create the best planner or perception systems. On top of that - there’s always a fair amount of self-guided discovery and troubleshooting just to get the thing up and running.
What’s actually in the data?
To be clear, the included dataset, intended for path planning work, doesn’t include path plans! If you have an AV dataset that includes the AV’s path plans - let me know! We’d love to work with you. In my work of AV risk assessment and path planning safety assurance, it would be great if someone was sharing path plans / path candidates / external object predicted paths. This is one of the areas where I hope our industry’s better angels will prevail for the sake of autonomous vehicle safety.
So nuPlan contains recorded data from a vehicle equipped with autonomous vehicle sensors but driven by a human. An ‘expert‘ driver to use stated terminology from nuPlan code. So you’ll get lots of tracked object data (that is, sensor data post processed and fused into lists of discrete objects tracked over time). The tracked objects each have associated bounding box properties and object classifications.
You’ll also get (human) ego vehicle data - the location and kinematic data of the driven vehicle. But you won’t get, say at time t=10sec. the predicted path of the external objects. They did post-process the human driver ego data enough to, and provide interfaces for, calling a function that will give you the short-term and long-term ‘goal’ position of the ego vehicle. It’s a start but I sure wish they had provided actual autonomous vehicle data with multiple ego path plan candidates at every timestep plus external object path predictions — but nuPlan didn’t make this just for me, I get it.
And that’s what’s in the Data — nuPlan also contains a simulator component to replay data or replay data with ego / actor simulation, metrics to measure performance of planning engines and some dashboards to visualize inputs and outputs. That’s all fine but the focus here is on getting at some of this data without necessarily becoming nuPlan platform experts.
Getting Started
The tutorial python scripts basically have 3 main sections: Training, Running the simple planner, and Running the trained planner. The tutorial is captured in a Jupyter Notebook (a convenient web-interfaced platform focused on Python code). But first you have to go through the installation of required software dependencies. This can be tricky, especially for those uncomfortable in Linux. Any issues I had I overcame quickly but the problem with any long-winded software dependency install is that any warning or less-than-100%-certain output encountered during the dependency installs and you’ll be left “hoping that doesn’t mess up anything down the line..”
Apart from the 3 main sections the tutorial scripts basically launch a dashboard service to view some stats comparing your multiple simulations (e.g. to compare different planner performances).
I will give plenty of credit to Motional on this because where I found issues, posted them to the nuPlan git repository I got responses from the not just ‘the community’ but rather from folks at Motional. Kudos to them on that.
Accessing the Data
So you can run the cells of python code in the Jupyter Notebook tutorial. Yay.
But you want to look at the data itself. You want to get a feel for what’s in it and how to access what’s in it. If you’re like me you want to play with the data and maybe even run it through your own code. We’ll use the code in the tutorial as a starting point. The tutorial file’s code actually just configures things and culminates with function calls where the work gets done. In the tutorial code you’ll see one configuration where they set up to use the “simple_planner” and one where they set up to use the “ML_planner.” They look like this:

Here’s how we’re going to do this. We’re going to see what we can leverage from the Tutorial file and then dive into the many many python files that are called by way of the Tutorial file Just remember - it’s in there and if they can do it, you can do it!
So clearly the chunk of code above just sets up a bunch of configuration variables. DATASET_PARAMS shows us there’s some selecting of scenarios by way of these paramteres ending in “filter”
I messed with the EXPERIMENT variable and made it have my name in it to see how it affects some outputs.
Don’t be afraid of those hydra variables - I’ve never used hydra before this but you can look it up here - it’s just configuration tools and it’s pulling in the strings in DATASET_PARAMS to again configure the simulation. We’ll keep this in mind later when we select between data / scenarios to analyze. For now let’s move on.
Finding the Data by Looking at how Simulations are Run
The goal again is to get at the data. My approach is - I know the simulation is accessing the data somehow somewhere, so let me drill into the function calls until it’s apparent where in code data is extracted and then see if I can follow similar code steps to access the data on my own. I could just jump to the end and tell you the summary of my learnings but then you ‘d be no better off than I was before I took the time to drill myself. So let’s do it together.
The next cell in the Tutorial calls the simulation:

A few things stand out — One this is only four lines of code and 3 of those aren’t super insightful. All the work is in main_simulation(cfg)! First we see that the function main_simulation is actually called main but was just imported with a different name. This is a common practice throughout the nuPlan code where powerful generic functions are imported with slightly different names. This is fine but heads up in case you get confused - you’ll see that main_simulation() and main_train() are actually defined as functions called main() but they are still different and defined in different files.
So let’s go into main_simulation(cfg) (python basics here, the from nuplan.planning.script.run_simulation import main as main_simulation tells us the directory path and filename where this function lives (nuplan/planning/script/run_simulation.py is the file and in it you’ll find a function called main).
Let’s pop this baby open:
What do we see? Setting up / selection of planners, logger, and a call to run_simulation(). Well we need to dive into that function clearly:
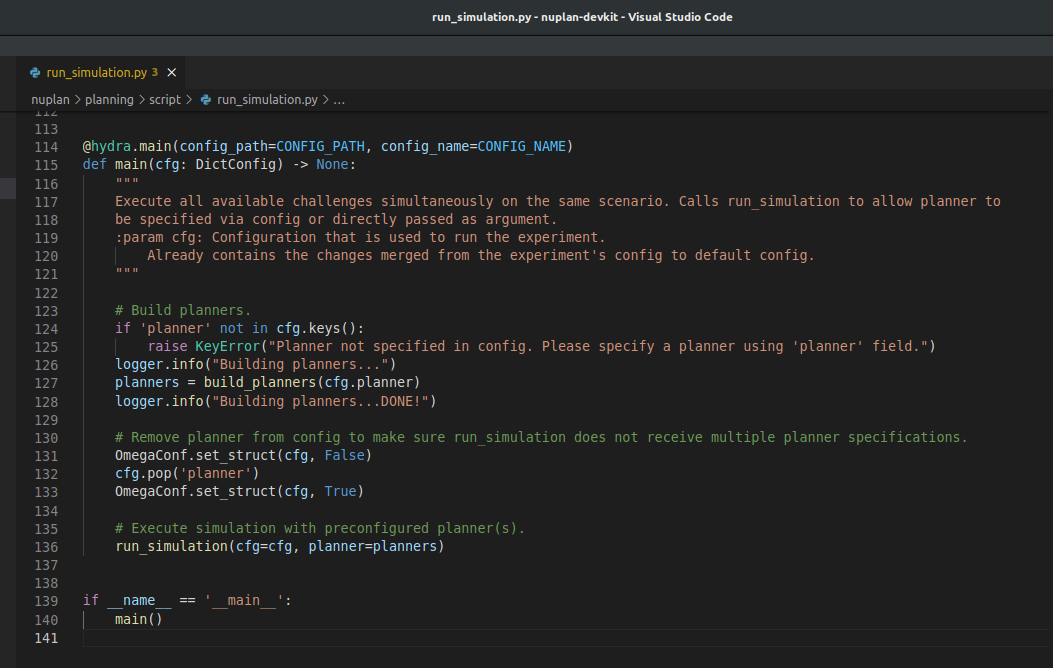
Below is a screenshot of the whole function. Sorry it’s small but I wanted to fit it in concisely. You can pull it up yourself at nuplan/planning/script/run_simulation.py
I drew boxes around 4 sections. Respectively, it calls:

build_worker which handles distribution of processing (multi threading and GPU stuff - I won’t dive in but know that’s the direction to go if you are curious about how processes are distributed. And yes this means that there will be multiple processing threads running simultaneously.)
build_scenario_builder which builds a builder (yes it sounds funny) of scenarios. This data structure is the link to the data being imported for the simulation. If you dive deep enough into this rabbit hole you start to see database structures (NuPlanDB). I went down this path to try to get the raw data but I haven’t directly worked with databases so I steered clear. If you’re comfortable with database stuff you can look into it. The custom database and blob storage classes are all there if you want to try. Anyway - This scenario_builder object will be used to help build the simulations in…
build_simulations which builds a list of simulation objects that will be iterated through. Think of these as a list of simulations to be run. Each of these simulation objects contains / links to the necessary parts of the simulation. Things like what Planner to use, what Scenarios to run through, manager structures to manage the simulation through its paces, and so-called Observation objects that house the perception data.
If building out from what’s there - the Scenario objects are your easiest handle into the data. A Scenario contains:
The ‘iteration’ (tied to timesteps) of a scene
Through the iteration you can access the Detections objects (think of these as tracked objects though it’s a little deeper) by way of Scenario.get_detections_at_iteration(…) and other functions ((see AbstractScenario class for more)
The “mission goal” for the scenario (a future vehicle state being targetted)
You can even access the human-driver’s ultimate state get_expert_goal_state(…) function
Meanwhile it is through the Simulation object that you step() through the iterations of the associated Scenario(s)!
Oddly enough it is the simulation_manager class that keeps track of what iteration the simulation (really of the scenario obj in the simulation object is at).
Exporting data - Modifying the Tutorial file
I was personally interested in extracting the following data:
Ego vehicle pose
External object pose and classification
Path plan trajectory(ies) for the ego
Predicted paths for the external objects
We’re going to do two things to get at these.
First we will add a new cell to the Tutorial file where we configure a new simulation run and call it. Second we will add a few file outputs to one file in the chain of python code that’s called - simulation.py. In this file we will modify one function - the step() function in the Simulation class. I’m including a link to both of these blocks of code but point to a few screenshots here for the sake of discussing.
Here’s the code for the python code you can add as a new cell to your tutorial notebook:
mike sim call.py
Pop it open and you’ll see my comments in each chunk of code explaining where I drew from to make it.
The top section configures what you want to simulate - you can pick a planner, then a CHALLENGE available in the dataset (red box, below) and then select filter parameters (green box, below) to filter in scenario types listed in the comment limit the number of scenarios filtered in. I included settings to use the “simple_planner"' and closed loop reactive agents challenge, the “ego at pudo” scenario subset and limited the scenarios to one. Start with these and then play with them once you are comfortable with the data being output. This setup takes my laptop about 30 seconds to process.

The PLANNER variable selects the planner to use. As the comment indicates you can choose the simple_planner or the ml planner - or if you later venture to make your own you’d specify it here.
The CHALLENGE variable lets you select the type of simulation used. Open Loop vs Closed Loop vs Closed Loop with reactive agents.
The scenario_types variable lets you filter scenarios in or out
The limit_scenarios_per_type variable lets you set a max on number of scenarios the simulation runs through
For this simple initial setup I selected the simple planner and limited the number of scenarios to just 1. This setup takes my laptop about 30 seconds to run. Once you get comfortable with your setup and the data being output you can play with these of course to get more of the data you need.
Next in the code you’ll see a big function definition mikes_run_simulation(...) which is essentially just the run_simulation(...) function found in run_simulation.py but with an extra line of code to create our data output file. Nothing fancy just standard python write-to-file stuff.

Exporting data - Modifying simulation.py
Knowing what I shared earlier about the structure of the code and the data mechanisms, I chose to modify one function in one file - simulation.py’s step(…) function.
This function executes one simulation step or iteration of the given scenario. Much useful data passes through this function and an updated trajectory for the ego is computed for this simulation step. In this function we have readily available ego pose data, external actor data, and we compute the new trajectory. If there is external actor trajectory prediction data, it too is at hand in this function - though it is an optional property of external object data in the nuPlan data structures.
For now I simply added a bunch of lines of code to this function to trial out exporting the data. An improvement would be to use the call_back function handles provided so be called at the beginning or end of the step(…) function or maybe to create your own simulation class that gets instantiated to do the work but now full of data outputs Again - we’re getting our feet wet and getting to know the structures and what’s there to quickly pull some useful data out so that you can even see if it’s worth going deeper.


Excerpts from the modified simulation.py
From the modified simulation.py file you see I’ve added a few imports up top - these are all files that already exist in the nuPlan project so that I can access some of the data flowing through the step(…) function. I didn’t modify any of those files.
Then at line 150 (bottom picture) I added a bunch of lines of code.
line 153 opens up the output file we created in the modification to the Tutorial file where we’ll write our outputs — yes hard coding file names is not the way, but see my Disclaimer
line 156-158 grabs the ego_state’s timestamp for this simulation step as well as the timestamp for the furthest-out ego trajectory step and (161) the timestamp for the ego trajectory step right in the middle between present time and furthest-out time
lines 160-162 writes these 3 ego object trajectory poses to the output file - so we should get a file with {base timestep, prediction timestep, x center, y center} as CSV data
line 169 grabs the tracked objects for this simulation step (i.e. external object data)
line 170 filters the external objects for only those of type VEHICLE just for simplicity
line 174-181 grabs all the predicted trajectories for the tracked objects (if any such predictions exist) and writes them to the outptut file
This code is in an ‘else’ block which, if you check out the full file (attached below) you’ll see is triggered in the nominal execution step where there is data found and a simulation step successfully is executed. Attached you’ll find the modified simulation.py file. Drop it into the nuPlan directory: ./nuplan/planning/simulation/ (backup your existing copy in case you want to go back). Now if you run the python script I provided and discussed above you should get an output file in the ./tutorials folder
modified simulation.py
I’ll say up front that I accessing external object prediction waypoints (lines 171-181, above) didn’t yield any data in the couple of scenarios I pulled up. I’ll leave it to the follow-up blog post on the details with that. I hate to assume anything but it’s likely that these get populated by the planner itself so that the ‘simple_planner’ I invoked didn’t generate these shouldn’t be a surprise.
If you’ve run the script provided you should see the file diaz_trajectories_simOUTS.csv in the ./tutorials/ path which will contain csv values like this:
This is nice and juicy raw data with the ego and external object poses. You can make simple changes to the code I’ve included in this article to access additional useful properties of the objects such as object ID strings, velocities, etc.
Your favorite IDE (e.g. VS Code) will let you right click and Show Definition on any of these variables we’re working with and you’ll get to classes like DynamicCarState and CarFootPrint which contain interesting object properties you’ll likely find use for in your endeavors.
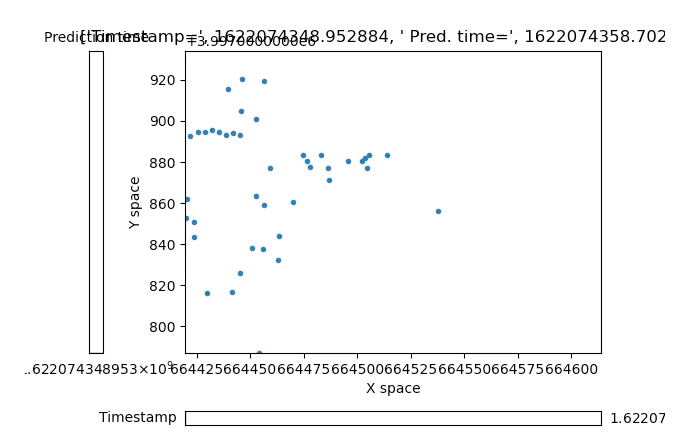
If you want to quickly plot a time-based visual of the data you’re working with here you are welcome to use a script I made myself:
mike nuplan plot.py
You’ll have to install some basic plotting dependencies (see top of the plot tools script for comments on this) but it’ll plot the simple data you export from the nuPlan set. It’s simple and lets you scroll through the base timestamp with a slider on the bottom as well as scroll through that base time’s predicted timesteps with a second slider on the left side of the plot:
Attached plot tool with basic object data positions from nuPlan dataset, mind the the formatting
Disclaimer
I don’t claim any of what I’m doing above is the best way to do this. I’m just starting with this dataset and I just need to rough cut my way through it to get certain data to play with. I suspect many readers are in the same boat so this is for them. Would Motional expert employees do some or all of the above differently? Almost certainly. If you want to chime in with comments on how to better do the above then by all means go for it. Happy to discuss.